Start coding some simple bots.
Aug 9, 2015 · 8 minute read · Commentstelegrambotsgo
All posts of the serie.
- Gentle introduction to Telegram Bots.
- Bot Revolution. Know your API or die hard.
- Start coding some simple bots.
- Let's keep coding more bots.
Hello Friend, welcome to this bot travel again.
Today, we are going to start coding our first bots! Yay! ^^
To accomplish this we are going to use the Go language and my library go-tgbot.
Install Go and TgBot
First of all, we need to install Go and the library. I’m going to explain it for linux, if you are going to use Mac it will probably be really similar, and in Windows you will have to search in Google.
Your distribution will probably have Go in the repositories, for example in ArchLinux pacman install go will install it, probably in apt based distributions will be similar.
If don’t, they distribute binaries for FreeBSD >= 8, Linux >= 2.6.23 (With glibc), Mac OS X >= 10.6 and Windows >= XP. You can download them and install in the official web.
After install it, you need some environment variables, this will work in FreeBSD, Linux and Mac OS X, for Windows search how to do it (Sorry, I don’t use Windows, so I don’t have idea <3)
Add at the end of your .bashrc, .zshrc, .cshrc or whatever *rc you use:
export PATH=$PATH:/usr/local/go/bin

# The GOPATH is where Go will install all the libraries and binaries, I like to have it in $HOME/go, but you can use the directory you want, make sure that it exist (mkdir $HOME/go)
export GOPATH=$HOME/go
export PATH=$PATH:=$GOPATH/bin
Read this post to know how Go work with GOPATH and how to write Go Code.
When you have all installed, open a new terminal to have all the environment variables setted (or execute source ~/.bshrc or the *rc you use).
Install the library is really easy, just execute this in your terminal:
go get -u github.com/rockneurotiko/go-tgbot
This will install the library in $GOPATH/src/github.com/rockneurotiko/go-tgbot, but you don’t have to worry about this.
Hello world bot!
In programming is common to write a hello world program that print “Hello World!” in the terminal.
I like to do what I consider a “hello world” program for bots. This is just a bot that will answer “Hello World!” to any message.
We use the main package because it will be an executable, and we import the tgbot library:
package main

import "github.com/rockneurotiko/go-tgbot"
Then, we are going to need the main function that will be executed when we run the bot:
func main() {
// Create a new bot with the token
bot := tgbot.New("YourBotToken")

// Add a handler for all messages
bot.AnyMsgFn(sayhelloworld)

// Start the bot using GetUpdates method
bot.SimpleStart()
}
And at last, we need the handler function (sayhelloworld) that we add as handler to the bot.
func sayhelloworld(bot tgbot.TgBot, msg tgbot.Message) {
// This is a beauty way of sending messages ^^
bot.Answer(msg).Text("Hello World!").End()
}
You can download the example here.
I’m going to explain some things about the code, you have the full documentation in the project, but it’s not updated (for example, the way of sending messages is not writed yet… I don’t have time u.U)
I think that are four key things in the code:
- Create the bot.
The bot is created with the tgbot.New("YourBotToken"), if the token is not valid, it will fail, so make sure that the token is valid. This function return an instance of tgbot.TgBot struct.
The token is the one that @BotFather gived to you when you created the bot (or revoke it with /revoke, or ask for it with /token)
- Add the handler.
The tgbot library work with handlers, doing all the hard work for you, in this case we are using the AnyMsgFn to add a function handler for all messages, we’ll see most useful handlers than this in the serie ;-)
The parameters of the function that is passed to the handler is really important, in this case, you need func(tgbot.TgBot, tgbot.Message)
- Do something in the handler.
In this case, we are just going to send “Hello World!” to the sender. This is straightforward with the tgbot. You just need to say Bot, answer the sender of this message the text "Hello World!". Thanks, that in programming is translated to: bot.Answer(msg).Text("Hello World!").End(). The End() call at the end is necesary to actually execute it :)
- Start the bot!
As we saw in the previous post, there are two ways of execute a bot, using getUpdates or using a webhook, the simplest one is getUpdates so for now, we’ll be using this, and to do that, just execute at the end bot.SimpleStart() (where bot is the previous instance of tgbot.TgBot).
Let’s run it and test it! :)
Execute this in the terminal to run it (change helloworld.go for your program file name):
go run helloworld.go

If you want to compile it, you just need to execute:
go build helloworld.go
This will create a binary file called helloworld (In windows is called helloworld.exe), and you can execute as any binary (In windows double click :P) :
./helloworld
And that’s all! Really simple isn’t it? ^^
Answering commands
Yeah! Our first bot!
Now, let’s do it to answer the basic commands that every bot should have: /start and /help.
The use of commands is really common in bots, and because of that, tgbot handle it in a special way.
Just in case you don’t know, a command start with /, and are two ways of calling them, the “global” command (/command) and the “specific” command (/command@username). The difference between the “global” and the “specific” is that in group, if you use the “specific” way, the @username bot will be the only one that receives that message. But you don’t have to worry about this with tgbot, the library will do it for you!
Let’s start like the other bot, with the package and imports:
package main

import "github.com/rockneurotiko/go-tgbot"
Now the main function, we are not using the AnyMsgFn handler anymore, because we don’t want to answer to every message, instead we’ll be using SimpleCommandFn, this handler works for commands without arguments, like this simple start and help.
Note how we are not setting the full command, for example we just say that the command is start and the library will understand it and handle it correctly (bot “general” and “specific” ways).
If you are curious, the command start internally is represented with the regular expression ^/start(?:@tutorialbot)?$
func main() {
// Create a new bot with the token
bot := tgbot.New("YourBotToken")

// Add a handler for the commands (Note the dot at the end of the first SimpleCommandFn to chain the handlers)
bot.SimpleCommandFn(`start`, start).
SimpleCommandFn(`help`, help)

// Start the bot using getUpdates method
bot.SimpleStart()
}
Again, we need to implement the handler functions, in this case, start and help. The functions type is different from the AnyMsgFn function, in this case the functions are func(tgbot.TgBot, tgbot.Message, string) *string. The two first parameters are as before, instance of the bot and the message struct, the third parameter is the text of the message, and the return value *string is because of an old way of sending text, we’ll use it in the start handler function. (The *string at the end will maybe be removed in future versions)
- Start handler
func start(bot tgbot.TgBot, msg tgbot.Message, text string) *string {
// The text to send!
answertext := `Welcome to @tutorialbot
This are the current commands:
- /help
- /start`

// You can send it with this line instead of returning the pointer to the text.
// bot.Answer(msg).Text(answertext).End()

// The string pointer that we return, if it's not nil or empty string, it will be sended to the sender.
return &answertext
}
- Help handler
func help(bot tgbot.TgBot, msg tgbot.Message, text string) *string {
// The text to send!
answertext := `Currently this is just a sample bot.
The commands available are:
- /help
- /start

@tutorialbot by @rockneurotiko version 0.0.1`

// Send it replying the message
bot.Answer(msg).Text(answertext).ReplyToMessage(msg.ID).End()
return nil
}
The way of sending the message are implemented differently, in the start function, the string is returned as a pointer, and the library will send it to the sender.
In the help function instead, we use the pretty way (to me) of sending things. In this case I added one more thing, the ReplyToMessage(msg.ID). This will do that the bot send the text replying to the message. I love to read this chains in plain language: Bot, answer the sender of this message with this text replying this message id. Thanks (The last “Thanks” is the “End()” call :P)
You can download the example here.
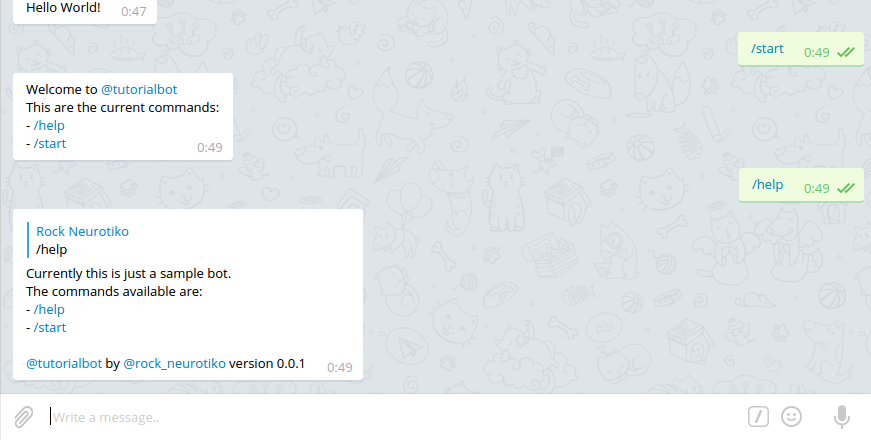
As before, let’s execute it (with go run or building it and executing the binary) and this are the results:

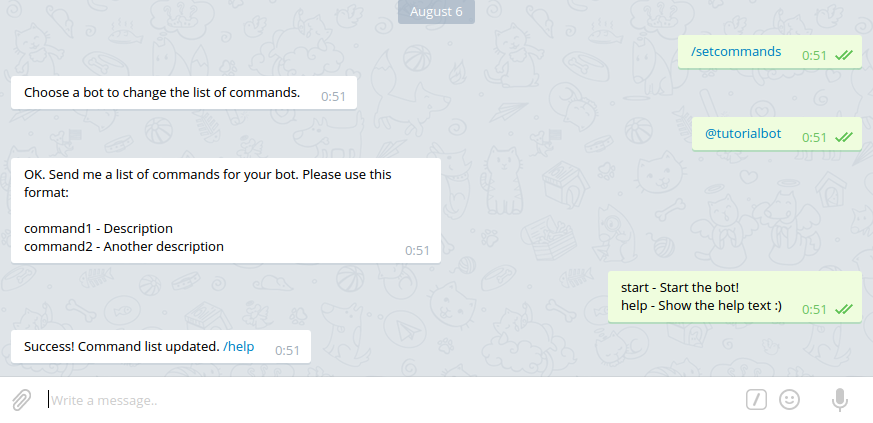
If you want to have the commands in the client GUI, talk with @BotFather, send him the command /setcommands, select the bot and send the text with the commands:


Text used:
start - Start the bot!
help - Show the help text :)
See you!
And that’s all for today! We made two bots! Two simple bots, but are two bots ^^
In the next posts I’ll show how to send other things more insteresting like images, audio, videos, documents and stickers.
If you have some idea for a good bot to implement for this posts series, please share it and let’s see if is simple enough but complicated at the same time for future posts.
I’m thinking too in doing future posts of implementing nice things like protect the bot with password, have a simple database with the users, …
Also, I’ll maybe do some screencast for more complicated bots :)
Let me know what do you thing, your ideas and what do you expect in the comments or in telegram